Genesis of the project
The vauban project was conceived as part of my work at Diabolocom. The aim of the project was to upgrade an existing component at Diabolocom, namely the management of servers’ images. Indeed, the servers and virtual machines boot using PXE on an image. This image, generated from a machine called master, contains all the programs and configuration for the servers or virtual machines that will be booting on them. There are as many masters as there are “types” of servers. For example, we will have a master “postgresql” which will contain the installation and configuration for all database servers, so all these VMs will be booting on the same image from the master. So we have a master for the gateways, for the logs, for the nodes backends, etc.
The servers then boot with PXE on this image (see below for more explanations), the administration is actually quite similar to the management of containers, since it is possible to make an analogy between master and docker image, and VM and container (to some extent).
This technique has several advantages:
- possibility of going backwards in a very clear way: just boot on an older version;
- simplified live visualisation of changes (see below);
- full VM provisioning;
- …
The way to administrate these masters, and the generation of images from the master, presented several problems, which the vauban project seeks to solve.
Issues and resolution
The master stateful problem
One of the main problems with this generation system was the need to have a “master” VM for each type of master we wanted to handle. Create a new type of image? First, a new VM has to be created, and this is done manually. The master image was built from the master VM.
So we have DNS, DHCP and netbox records for these master VMs, VMs that are running and basically doing nothing (while still taking up RAM), to be able to generate occasionally an image out of it.
The provisioning was manual (i.e. all the resources of the VM must be created manually, the VM must be installed manually via the debian installer), which was already a problem in itself for flexibility.
However, the real problem was the management with IaC (Infrastructure as Code).
The problem of IaC with VM masters
Diabolocom uses Ansible extensively for all infra management. A known “problem” inherent to the operation of Ansible is the management of the deletion.
Ansible is stateless, unlike Terraform for example. The idea is to declares a resource, which is desired to be in a certain state, but the resources that are not defined by Ansible are ignored. This is an advantage, but also a disadvantage.
Let’s take user management as an example. With Debian 11, you already have a number of pre-existing users. If you want to use Ansible to add your own, you can use the user module :
- name: Add user zarak
  user:
    name: zarak
    state: present
This Ansible task will create the zarak user if it doesn’t exist, or do nothing if it already exists (idempotence).
Now to delete this user, one can’t just delete this task, he must explicitly request the deletion of the user, like this:
- name: Ensure user zarak doesn't exist
  user:
    name: zarak
    state: absent
Now imagine that this explicit deletion step was not written during a big change on our Ansible: the user will remain on the machine because it was never explicitly deleted.
The reasoning can be extended to things other than users. The machine being stateful, one could imagine a manually installed backdoor on the machine that will never be removed, a package installed via apt (via ansible or not, whatever) that would never be uninstalled, etc.
Other problems
This system also had other problems which will not be detailed here, but in short :
- Problematic configuration management
- The initramfs behavior
- Scripts for booting or generating images
- Updates
- …
Solutions provided by Vauban
The idea of vauban is to systematically start from scratch (from an official image debian raw), and apply the necessary Ansible playbooks to reach the desired image. There are no stateful elements, remains of a partial uninstallation , … You don’t need to have a running VM for that either. Thanks to chroot(1) for example – to name just one – we can create images anywhere: locally on our machines, or in gitlab-CI.
This system, in addition to solving the problems presented above, offers also other elements relevant to image management, and will be presented in more detail later in this article.
Prerequisites
Before understanding the project and how it works, it is important to understand the technologies employed and used together to create the finished product.
PXE
The core element of the boot system here is the use of PXE.
Although fundamentally unnecessary for Vauban, this is the method that was chosen by the previous team to manage VMs and servers. Vauban must therefore be able to generate images that work with PXE, and in fact this is the approach which was chosen.
Currently Vauban only manages images that are intended to be bootable with PXE. They must surely be able to work with a local boot as well, but it has never been tested, and precise configuration for PXE boot is provided in the project.
Without going into all the details of PXE, the idea is to be able to boot on the network.
The classic idea of booting a server/VM/laptop/whatever is to have locally a “bootable” disk, i.e. containing at least one boot partition and a “root” partition, and let the BIOS/UEFI boot on it.
With PXE, you don’t boot on a local disk, but on resources in the network. To do this, you must have a compatible network card, the BIOS/UEFI must be configured to boot with PXE, and have a DHCP server.
You get an IP address from the DHCP server, as well as some PXE-specific instructions (always via DHCP) regarding the address of a server to contact and a file to download on it, with TFTP for example.
The computer takes care of downloading this file, in this case a network bootloader (grubnet). This bootloader will then download our kernel (vmlinuz) and an initramfs (see below).
The next step is to start the kernel, and to give it our initramfs. Then, the boot process can continue depending on the configuration of our initramfs.
The idea behind this, is the possibility of not having a hard drive in the machine for example, but also to be able to centralise in a single point on what the machines will boot.
Not having a hard drive to back up our OS means that the OS will be in RAM. All changes that will not be saved to external storage will be lost during the next reboot.
PXE is used at EPITA for student workstations. The CRI creates the image for the students to work on (or take an exam), and the same image is made available on all stations through PXE. If a student breaks the OS, a reboot and it’s fixed. The identicity of the OS is also assured to avoid the classic “it works on this machine but not on that one”, or to avoid cheating in exams, for example.
How Linux boots
The components
Knowing briefly how Linux boots is fundamental to understand the project.
Essentially, 3 resources are needed:
- A kernel (
vmlinuz) - A rootfs
- An initramfs
The kernel is simply linux in this case.
The rootfs is our actual OS, which is what will be mount-ed on /. If one can have /home or /var for example mounted on other drives, / (so your rootfs) must contain the minimum of a classic OS (Debian by example), so /etc/, /usr/, etc …
The size of the rootfs can thus be relatively large, since it varies from a few hundred MiB to a few GiB
The initramfs is a somewhat lesser known element, and is therefore detailed in its own section in this article.
An initramfs is not actually necessary to boot, but it becomes necessary in many setups, such as whether the rootfs is encrypted, or whether the rootfs is obtained in a network by torrent for example. It is therefore practical and common to to say that it is in fact necessary.
Of course there are exceptions, for example for embedded systems, but the descriptions given here tend to remain rather generic.
The boot
During the boot process, the kernel is loaded into memory, as well as the initramfs (hence the RAM in initramfs). The kernel takes care of a lot of setup which will not be detailed here, then run the init process of the initramfs.
The initramfs and its init process “do things”, and pass the torch to the rootfs once it has finished. Once the rootfs init process has finished preparing the last things and launched the services to be launched, one can consider the boot process to be completed.
The default init process on the most popular linux distributions – including Debian – is most often Systemd.
Systemd at startup takes care of – among other things – starting the services that have been enabled, to launch the (.mount units, some .target, etc), … It is possible to get some information with sudo systemctl list-units --all, sudo systemctl list-unit-files and sudo systemctl status.
The initramfs
The initramfs is a machinery that may seem at first sight rather complex and blurred. Rest assured, this is also the case on the second and third approaches. Its role is to prepare all that is necessary for the rootfs.
To fully understand the purpose of the initramfs, it is best to look at some concrete examples:
-
How to boot on an encrypted partition/rootfs?
Linux is not able to decrypt an encrypted partition “by itself”, it seems therefore difficult to find out on a encrypted partion how to boot on it. The initramfs comes into play here by being unencrypted (so linux can run it), and by having an init process capable of requesting a password from the user, and use it to decrypt the rootfs. Once the rootfs is decrypted, the initramfs gives way to the rootfs.
-
How to boot on an exotic filesystem?
If for some reason one decides to use something else as a filesystem than those natively supported by Linux (ext4, xfs, …), one may need to load a specific kernel module for the rootfs. The initramfs will therefore load the appropriate kernel module(s), and then allow the kernel to mount the rootfs, to finally switch on it.
-
How to boot on a rootfs located on the network?
For example, if for some complete random reason, one seeks to boot on a rootfs which is outside the machine, somewhere on the network, one would need to build a network stack (get an IP address for example), have something to download the rootfs via a network protocol (HTTP, torrent, …), and then know what to do with the downloaded rootfs before switching to it. Since Linux can’t do it all by itself, this is once again a situation where an initramfs is needed.
The initramfs is an archive that should be containing the bare minimum to be able to carry out one or more of the steps mentioned above, necessary for the boot process. The archive is therefore small: a few MiB, up to tens of MiB.
Quite often, the initramfs is generated by a tool (initramfs-tools, dracut, mkinitcpio, …) which detects what the current machine needs to boot, and create a specific archive for our installation.
It is possible to influence the creation of the initramfs via the config of the tool generating it, or through a system of hooks, very common in the initramfs building process.
The codes executed in an initramfs are most often shell scripts (bash, ash, …), by the nature of the operations carried out (many calls to “system” binaries)
The initramfs allows to keep the genericity of the kernel, while allowing us to have systems that operate quite differently from each other, with their special needs.
The name initrd can also be found. Although there are some differences between initramfs and initrd, their role remains essentially the same, It is possible to use either one of them. The initramfs, however, remain to be preferred as it is easier to use. The main difference between the two is the way the data is stored:
- the initrd is a block device in RAM, so it needs to be
mounted and have a filesystem (e.g. ext4). - the initramfs is an archive, in
cpio(1)format. It is therefore sufficient to extract the archive to access its contents. The kernel takes care of mounting atmpfsin which it will extract the initramfs. So there is no need for a filesystem, tmpfs being used here and being a virtual filesystem purely in RAM it’s in the kernel itself
The stages of the initramfs
The initramfs generally follow a similar logic, a sequence of identical steps. Let’s look in detail at the steps of an initramfs taking for example an initramfs generated by mkinitcpio:
file initramfs.img
initramfs.img: gzip compressed data, max compression, from Unix, original size modulo 2^32 155400192
mv initramfs.img initramfs.img.gz && gunzip initramfs.img.gz
file initramfs.img
initramfs.img: ASCII cpio archive (SVR4 with no CRC)
cpio -i < initramfs.img
cpio: dev/console: Cannot mknod: Operation not permitted
cpio: dev/kmsg: Cannot mknod: Operation not permitted
cpio: dev/null: Cannot mknod: Operation not permitted
cpio: dev/random: Cannot mknod: Operation not permitted
cpio: dev/urandom: Cannot mknod: Operation not permitted
303516 blocks$ strace -Z -e trace='!lstat' cpio -i < initramfs.img
...
mknodat(AT_FDCWD, "dev/urandom", S_IFCHR|0644, makedev(0x1, 0x9)) = -1 EPERM (Operation not permitted)
cpio: dev/urandom: Cannot mknod: Operation not permitted
...
This page also contains information about char devices and major/minor in linux
$ ls
bin etc initramfs.img lib run usr
buildconfig hooks initramfs.img.zst lib64 sbin var
config init keymap.bin new_root sys VERSION
dev init_functions keymap.utf8 proc tmp
$ # we're in the extracted initramfs, not our rootfs
$ pwd
/tmp/initramfs-working-dir
$ file init
init: Neil Browns ash script, ASCII text executable
$ cat init # The file here isn't accurate. It has been curated for demonstration purposes.
#!/usr/bin/ash

. /init_functions

mount_setup

# parse the kernel command line
parse_cmdline </proc/cmdline # [Redactor's note: #1]

# setup logging as early as possible>
rdlogger_start # [Redactor's note: #2]

. /config

run_hookfunctions 'run_earlyhook' 'early hook' $EARLYHOOKS # [Redactor's note: n°3]

if [ -n "$earlymodules$MODULES" ]; then
    modprobe -qab ${earlymodules//,/ } $MODULES # [Redactor's note: n°4]
fi

run_hookfunctions 'run_hook' 'hook' $HOOKS # [Redactor's note: n°5,6,7]

if [ "${break}" = "y" ] || [ "${break}" = "premount" ]; then
    echo ":: Pre-mount break requested, type 'exit' to resume operation"
    launch_interactive_shell
fi

rootdev=$(resolve_device "$root") && root=$rootdev # [Redactor's note: #8]
unset rootdev

fsck_root

# Mount root at /new_root
"$mount_handler" /new_root # [Redactor's note: #10]

run_hookfunctions 'run_latehook' 'late hook' $LATEHOOKS # [Redactor's note: #11]
run_hookfunctions 'run_cleanuphook' 'cleanup hook' $CLEANUPHOOKS

if [ "${break}" = "postmount" ]; then
    echo ":: Post-mount break requested, type 'exit' to resume operation"
    launch_interactive_shell
fi

# [Redactor's note: n°12]
exec env -i \
    "TERM=$TERM" \
    /usr/bin/switch_root /new_root $init "$@"
Let’s rephrase the steps:
- Look at /proc/cmdline (proc(5)) – our runtime configuration source
- Setup logging
- Launching hooks (early/pre-module)
- Load kernel modules (
modprobe(8)) - Launching hooks
- Run
udev(7)(here via hook #5) - Launching hooks (here the same hooks as #5. The order of the hooks is important)
- Preparing the disk(s)
- Launching hooks (pre-mount)
-
mount(8)the disk(s) - Launching hooks (late/cleanup)
-
switch_root(8)on the new init
Dracut provides similar steps, with some subtleties, like an additional hook before triggering udev (step 6 is not a hook like with mkinitcpio, and is divided into 3 steps: launching udev, hooks, and trigger of udev via udevadm), or other names for hooks (such as pre-pivot instead of late). The general idea remains the same.
It is also possible to use systemd as an init process, even in the initramfs. The steps are thus divided into target, mount and service.
Creation with vauban
The aim of vauban is therefore to be able to generate these different elements, and in a comfortable, repeatable way.
Let’s start with the generation of the initramfs:
Generation of initramfs via dracut with Vauban
For the creation of the initramfs, dracut is a good tool, because of its maturity and completeness. I will skip the details of all the steps that lead me to find the final result, I will instead present you directly with the final operation of vauban for the generation of the initramfs.
To begin with, it is necessary to start from a base, an initial ISO from which we will install our services and create our components. At Diabolocom, we use Debian, so let’s take the Debian 11 RAW image.
Currently Vauban only handles Debian, because of some debian-specific code.
Let’s take a look at the steps in vauban’s build_initramfs function:
build_initramfs
mount_iso
To begin with, we need to find an angle of attack on our downloaded raw image. This image is a block device containing several partitions. To access it, it is necessary to create a loop device with losetup(8), then mount the partition which is an ext4 filesystem, somewhere.
A loop device is a mapping of a classic file to a block device. This allows you to use functions and utilities that expect to interact with a block device on our file that represents a disk.
The changes we make are carried over into the .raw file, it is therefore necessary to make a backup of the intact file beforehand, or else we’ll have to re-download it each time vauban is launched.
bootstrap_fs
Our OS is mounted and easily accessible, first of all you have to do some operations in it to prepare it for the next step.
To do this, the bootstrap_fs function chroot(1)-s in our fs to :
- Set up DNS
- Delete the fstab file, which does not apply to us
- Remove the bootloader and the basic initramfs generation tool (
initramfs-tools) - Update the kernel and remove old versions
build_initramfs – the kernel
The kernel being updated, it is now necessary to “find” it, look at its version and put it aside. To do this, a simple find(1) will do, coupled to file(1) (to easily extract the version).
The kernel is put aside, we now have one of the three elements necessary to boot (admittedly, the easiest to obtain), yay!
So let’s create our actual initramfs, using dracut.
chroot_dracut
To use dracut in our image, the easiest way is to chroot into it. It’s a good idea to do this to install it, configure it and run it, to ensure that the interactions between dracut and our OS run smoothly.
Let’s use chroot(1) to install the Debian packages for dracut.
You have to pay attention to the packages names, which change from Debian 10 to 11. If for Debian 10, it is sufficient to install dracut, dracut-core and dracut-network, for version 11 you will also need dracut-live and dracut-squash.
We can then place the following dracut.conf in our FS:
add_dracutmodules+=" ifcfg "
add_dracutmodules+=" bash "
add_dracutmodules+=" livenet "
add_dracutmodules+=" dmsquash-live "
add_dracutmodules+=" virtfs "

omit_dracutmodules+=" iscsi "
omit_dracutmodules+=" nfs "
omit_dracutmodules+=" lvm "
omit_dracutmodules+=" fcoe "
omit_dracutmodules+=" fcoe-uefi "
omit_dracutmodules+=" crypt "
omit_dracutmodules+=" btrfs "
omit_dracutmodules+=" bootchart "

add_drivers+=" overlay "
add_drivers+=" loop "
add_drivers+=" squashfs "
add_drivers+=" e1000e "
add_drivers+=" bnx2 bnx2x bnx2fc bnx2i cnic "

early_microcode="no"
hostonly_cmdline="no"
use_fstab="no"
mdadmconf="no"
hostonly="no"
Spaces within quotes are necessary and cannot be deleted!
The configuration here is dedicated to PXE boot. In the modules, we ask explicitly bash, but also the modules needed to have a networked rootfs, a live one.
If these modules are not available in our chrooted debian, it is possible to download them/copy them from the official dracut repo to put them in /usr/lib/dracut/modules.d/ (in our Debian fs, obviously)
It is also explicitly requested that we do not install modules that are not relevant, since our setup uses neither NFS, nor BTRFS, nor LVM, nor encryption, …
This doesn’t mean that you won’t be able to use NFS & co once the OS is booted, it just means that we don’t have the support for these technologies in our initramfs. Since we don’t use them to boot, mount our rootfs, etc., we might as well save disk space and not include them.
We ask for the useful drivers for the network (e1000e) and those which will be useful for us for our rootfs (see below).
Finally, we ask dracut to generate an initramfs which will be generic, and not dedicated to our current machine (default behaviour).
You can then run dracut to generate the initramfs (this is a task which takes time):
dracut -N --conf dracut.conf -f -k "$modules" initramfs.img "$kernel_version" 2>&1 > /dev/null;We need to specify the kernel version and the location of its associated modules since we are currently in chroot: the current kernel with which one runs is not necessarily the one against which one seeks to build the initramfs (in this case I use ArchLinux, so I have the kernel 5.15.7 versus 5.10 for debian 11). Without specifying this information, dracut will try to generate an initramfs for the 5.15.7 kernel, which will cause problems at boot time with our kernel 5.10.
After some time, we can find the file initramfs.img which interests us!
Modularity of dracut
Our initramfs can be configured with the dracut.conf, but also more deeply via modules. The strength of dracut is its modularity.
Dracut consists of the generation of a robust and generic skeleton, which is configurable by modules. Modules have a module-setup.sh script executed at the generation of the initramfs which allows dracut to determine if the module is relevant for this current generation.
For example, if you want to create an initramfs for your current machine, and it uses encrypted rootfs, dracut offers a 90crypt module to decrypt the rootfs by asking the user for his password.
The module is only installed if the rootfs is actually encrypted, and the binary cryptsetup – needed to decrypt the disk – is present on the machine. If this is not the case, the module is not installed in the initramfs.
If the module is installed (the check() function in module-setup.sh returned true), the module can specify dependencies among other modules for its own, via the depends function. Thus, 90crypt depends on dm and rootfs-block.
The module exposes several functions, which will be called by dracut during the generation, still in module-setup.sh, for the module’s installation in the initramfs. The installation can be “complex”, i.e. it can consist of several bash scripts that will be executed at different times: the famous hooks mentioned above.
The runtime configuration of the module is done via the kernel cmdline.
Our rootfs
Now that we have the kernel and the initramfs, we need to generate the last element to have a complete picture: the rootfs.
Thoughts on rootfs and our use case
In reality we already have the rootfs: the raw image of Debian that we have been using for a while now, is our rootfs. It contains indeed our OS, and is mounted on /.
It is therefore from this image that we must start. However, the image alone obviously would be a little light. We have to add to that our whole configuration, our packages, etc.
In the manner of the old ‘masters’ who were VMs, we will seek to generate one master, i.e. one type of rootfs, per role.
Our old master-postgresql will thus become a virtual representation (as opposed to a … virtual machine) of this master by a pair of (initial rootfs, what to install and how), as well as designating the final rootfs produced by the sum of this couple.
In other words, a master with vauban is :
- a rootfs which contains our configuration and programs for a specific use, for a specific type of VM (a rootfs for postgresql for example)
- also the description of how to get to this rootfs, how to generate it, thhe pair
(rootfs inital, what+how to install).
Hierarchical approach
If you think about it a little more, you realize that all our VMs have a common basis :
- basic packages installed everywhere (vim, openssh-server, …)
- of the security configuration
- configuration to allow ops access to the machine
- configuration to centralise logs
- monitoring
- ….
It would therefore be appropriate to centralise and pool this “basic” image, built from our Debian raw, to use this new image as a “base” image for all other images.
Since we had assumed that a master was defined by an initial rootfs, we just have to consider that instead of starting from the rootfs provided by debian to install our postgresql, we will start with our new “base” image and then add postgresql.
If we go further, we realise that some packages are present in many machines. For example docker is frequently used. By a similar reasoning, it can be considered relevant to create an image with docker, created from our ‘base’ image, which can then be reused to derive other images.
So we are creating a hierarchical system of images.
As we are doing IaC, it is important to lay the configuration flat. This is why vauban provides a config file, the aptly named config.yml. (we like YAML as a YAMl-engineers), which takes care of declaring the masters with the above-mentioned hierarchical approach.
Let’s look at an excerpt from this configuration file:
"debian-11-generic-amd64.raw":
  name: debian-11/iso
  master-11-base:
    stages:
      - playbook_base.yml
    master-11-postgresql:
      stages:
        - playbook_postgresql.yml
    master-11-docker:
      staged:
        - playbook_docker.yml
      master-11-harbor:
        stages:
          - playbook_harbor.yml
      master-11-elastic:
        stages:
          - playbook_elastic.yml
This configuration file is incomplete for vauban, and only represents the current state of thinking for demonstration purposes on how to manage masters and configuration. See below for the complete file.
As shown in this configuration file, we can see the hierarchy of the master’s creation. The master-11-harbor and master-11-elastic both depend on the master-11-docker master, which itself depends on the master master-11-base, etc. At the root, we find our Debian raw image from which we started.
The stages are the steps to be played for the master’s creation. Thus, in summary, creating the master-11-docker master requires starting from the master master-11-base and apply the ansible playbook playbook_docker.yml to it.
Such system requires methodology for maintenance and updating, or appropriate tooling. Updating master-11-docker will only update the contents of the playbook playbook_docker.yml, so it is necessary to reconstruct the whole tree regularly, or if a change in the tree is introduced upstream of several masters. Similarly, an update in the playbook_base.yml results in the need to rebuild master-11-base, but also all the leaves that depend on it (and so on), to propagate the updates.
And the configuration?
While it is all very well to talk about a common master for a grouping of machines, there comes a time when 2 VMs, say 2 postgresql servers, will have the need to distinguish themselves from each other.
Although they will share 99% of their rootfs in common, have the same OS and same packages installed, they will need to have their own hostname for example, or a slightly different postgresql configuration.
For the hostname case, it’s actually a non-problem since it can be determined automatically when the machine is booted by looking at the IP provided by DHCP and making a DNS PTR request. The machine own configuration is however a different matter.
We could generate one rootfs per machine, but duplicate the 99% (or more) of the rootfs in common by so many machines seems to indicate that this solution is sub-optimal. It is even more so when one considers the size of a rootfs: about 800 MiB for a rootfs with postgresql, for only a few KiB difference in the pg_hba.conf.
It is therefore useful to have a mechanism to pool the common part of the machines (the rootfs), and to add the configuration per machine.
This is the approach developed by Vauban, with the creation of a conffs.
While rootfs contains the OS and all programs, conffs contains only configuration, or the few small differences from one host to another.
The final machine is obtained by summing rootfs and conffs.
If we take our hierarchical system of rootfs creation, with the notion of master consisting of the pair (rootfs/initial master, configuration to apply), we realise that our conffs can be constructed in a similar way. It would be enough to make the difference between the final result and the initial state to obtain the conffs.
This approach is implemented in vauban and explained in the rest of the article.
If, as its name suggests, the conffs is dedicated to holding the configuration of a machine, in reality there is nothing that dictates that the conffs cannot contain other things (e.g. a more up-to-date version of a programme). There are no restrictions on its size.
And how was the configuration managed before?
Why not just copy the configuration management system with the previous method of generating images?
Simply because the technique used was to put all the configurations of all machines drawn from a master on that master.
So, for pg_hba.conf, we had pg_hba.conf.<hostname> with as many .<hostname> files as we had hosts taken from this master. There were a service at the start of the machine that took care of softlinking the pg_hab.conf.<hostname> config file to pg_hba.conf, to make available the configuration file to be used in this case.
Writing in ansible was tedious, the roles were lengthened (to set a single config file, it would actually have to set 50 if we had 50 machines taken from this master, so 50x more time for the task), all machines had the files, adding a machine caused diffs on all other machines, it was necessary to systematically remember not to configure directly in the config file itself, but in its .hostname, remember to update the startup service’s configuration who’s reponsibility is to link our file to actually link the right or newly added files, etc, etc …
In the end, conffs are simpler, aren’t they? ![]()
Generation of rootfs with vauban
If, like me, when you see this hierarchical system of rootfs and conffs you think of overlayfs, congratulations, that’s actually how vauban manages its rootfs and conffs!
More exactly, vauban uses docker. Why use docker?
- Docker naturally offers a hierarchical build system (
FROM ....in a Dockerfile) - Docker uses overlayfs, allows us to extract our conffs easily
- Docker allows us to store and move our rootfs and intermediate steps easily with the registry
- Docker offers tooling around chroot and chrooted execution and isolation
- Docker also has tooling to import and export archives
- …
Importing rootfs into docker (import_iso)
Our initial rootfs, taken from the Debian raw image, must be imported into Docker to allow us to start working with it.
To do this, we look at our initial image to see which version of Debian is in use (via lsb_release), then we create a docker image with docker import which we will name with the Debian version + raw-iso (example: debian-11.0/raw-iso)
The raw-iso does not correspond to the idea that one might have of an image totally minimalist, since it contains packages that are useless for our usage.
The first step will therefore be to “clean up” this image by removing the packages (including, for example, dracut, which we had installed earlier).
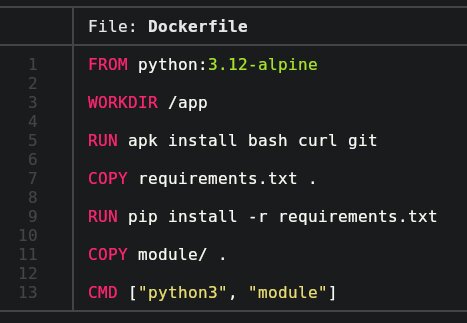
To do this, vauban uses the first Dockerfile, Dockerfile.base, which removes many packages of live images, and some packages of raw images.
The dockerfile also takes care of preparing the image for the next step, by installing python and ansible, by setting the SSH deployment key of ansible, the one used to clone the repo, and actually cloning the repo into /root.
After a docker build, we have a docker image corresponding almost to our source image, except for a few details. This image is called for example debian-11.0/iso.
Ansible application (apply_stages)
Now that we have successfully imported our initial rootfs in Docker, it is a matter of applying Ansible to this rootfs. If we take the vauban configuration file presented above, this configuration to apply for Ansible is a list of “stages”, i.e. a list of ansible playbooks to apply successively.
This is the role of the apply_stages function. Let’s look at how it works in more details.
The function takes as argument :
- source_name`: The name of the source image to which we want to apply the changes;
-
prefix_name: The common prefix to name all the intermeditate layers of the stages’ application; - final_name` : The name of the image to be obtained;
- hostname: The hostname to be defined in our docker build, to simulate application of our ansible playbook on such a
hostname(and thus have the right ansible group, the right variables, etc) - stages: The list of playbooks to be applied
The stages are not just a list of playbooks to be applied, they also allow to select a git branch of the ansible to apply a playbook from, instead of the chosen default branch.
This option can be useful if creating a rootfs requires the application of several playbooks that would be – for the moment – on several different branches of ansible.
The syntax of an stage is therefore [<branch>@]<playbook>.
The common prefix is the way of naming each step to create the final image. Each stage' to be applied actually creates an intermediate docker image which is then used to apply the next one, and so on. Each of these intermediate images is called $prefix_name/$stage[$i]`.
For example, if we are looking to build the master-11-elastic in the example above:
- master-11-docker
- master-11-docker/playbook_elastic.yml
- master-11-elastic
The master-11-docker/playbook_elastic.yml and master-11-elastic images are in fact two different labels for the same docker image. Indeed, master-11-elastic is nothing more than the master-11-docker image on which playbook_elastic.yml was applied.
Let’s look at the docker build step in more detail:
docker build -f Dockerfile.stages
For each application of a layer, Docker is called as follows:
docker build \
            --build-arg SOURCE="${iter_source_name}" \
            --build-arg PLAYBOOK="$local_pb" \
            --build-arg BRANCH="$local_branch" \
            --build-arg HOOK_PRE_ANSIBLE="${HOOK_PRE_ANSIBLE:-}" \
            --build-arg HOOK_POST_ANSIBLE="${HOOK_POST_ANSIBLE:-}" \
            --build-arg ANSIBLE_ROOT_DIR="${ANSIBLE_ROOT_DIR:-}" \
            --build-arg HOSTNAME="$hostname" \
            --no-cache \
            -t "${prefix_name}/${local_pb}" \
            -f Dockerfile.stages .
We provide several arguments to our docker build, which are the parameters of our stage: from whom, how and what to build.
There are also pre and post ansible-playbook hooks. In the bash variables we can put some bash script that will be executed before and after the execution of our ansible-playbook. This is a good way to keep the genericity of vauban while by having a way to perform specific actions. For example, one can do an ansible-galaxy install in the $HOOK_PRE_ANSIBLE.
We remove the cache, to force the rebuilding of our image.
The image created is the one explained above: $prefix_name/$playbook.
Let’s look at the Dockerfile :
ARG SOURCE

FROM ${SOURCE}

ARG SOURCE
ARG PLAYBOOK
ARG HOSTNAME
ARG BRANCH
ARG HOOK_PRE_ANSIBLE
ARG HOOK_POST_ANSIBLE
ARG ANSIBLE_ROOT_DIR

RUN cd /root/ansible/$ANSIBLE_ROOT_DIR && \
    git fetch && [ "$(git rev-parse HEAD)" = "$(git rev-parse origin/$BRANCH)" ] || git reset origin/$BRANCH --hard && \
    echo $HOSTNAME > /etc/hostname && \
    echo "\n[all]\n$HOSTNAME" >> inventory && \
    hook_pre_ansible() { eval "$HOOK_PRE_ANSIBLE"; } && hook_pre_ansible && \
    ansible-playbook "${PLAYBOOK}" --diff -l "$HOSTNAME" -c local -v && \
    hook_post_ansible() { eval "$HOOK_POST_ANSIBLE"; } && hook_post_ansible
The Dockerfile here allows us to be generic as it can be applied from any rootfs to get any other rootfs (using ARG SOURCE).
The steps are not very complex:
- Make sure you have the latest version of the ansible repo, and checkouts the branch that has been requested
- We set our hostname to the one requested
- Make sure the hostname exists in the ansible inventory. This step is useful for example when creating a master, which would not exist necessarily in the inventory (since it is not really a machine)
- The hooks are executed
- Run ansible locally, on yourself
- The hooks are executed
Step 3 is probably not generic and may need to be adapted/changed.
This way of applying Ansible has some drawbacks. See the section limitation with ansible.
From docker image to rootfs: build_rootfs
Once our Docker image has been generated, it’s time to export it as a rootfs on which we can boot. This is the role of the build_rootfs function.
Fortunately, Docker is kind to us and provides docker export, which allows us to export our entire rootfs as tar(1).
Let’s export our image to a temporary folder :
rm -rf tmp && mkdir tmp
echo "Creating rootfs from $image_name"
docker create --name $$ "$image_name" --entrypoint bash
cd tmp && docker export $$ | tar x
docker rm $$
So our tmp folder contains our entire rootfs. All that is left is to prepare and compress it.
This will include:
- Link /etc/resolvconf to overcome the fact that Docker mounts it automatically in a container (and therefore breaks it when exported as the resolvconf is the building host’s one)
-
apt-get clean -y, to avoid taking up too much space with cached.deb. - Remove our ansible repo, the SSH key that was used for
git cloneand the old initramfs (we already have our own).
SSH server key management: put_sshd_keys
An important step at this point is the management of server sshd keys. If we have other solutions to manage it (such as imposing them in Ansible, setting up an authentication by certificates system, etc.), the solution chosen here is to have Vauban as a configuration source for ssh server keys.
And yes, if we let openssh-server generate its keys in the installation, we would have two problems:
- All machines built from the master in which openssh-server was firstly installed would have the same server ssh keys, so the same identity.
- Rebuilding said master would change the keys, changing the identity of the server.
To overcome these two problems, it is simpler to manage sshd keys in vauban, when building the rootfs archive, specifically when cleaning the image of build dependencies.
Vauban therefore manages in its repo a ~vault in which are stored the keys of all machines. When creating a master, if its key has not yet been generated, it is generated, placed in the rootfs, but also encrypted symmetrically with a configurable password in Vauban, and stored in git. During the next build, the key already exists, so it’s then decrypted and used. This is the vault/ folder, with the sshd keys tar-ed and gpg-ed in it.
If we build an image in the CI, Vauban also commits the generated keys so that they are not lost. These are the automatic commits [CI] Update vault/
The notion of vault is relative, one could use a solution like hashicorp vault, but the solution of having a vault managed in the repo is a good compromise between security and simplicity.
mksquashfs
To finalize the creation of our rootfs, we must now convert the temporary folder we were working with in as an archive. For the rootfs, the format chosen is squashfs, which is perfectly suited to this kind of operations. This is done using the mksquashfs command, and compression is done via xz, which is slow but quite efficient. The options -noappend -always-use-fragments -no-exports to save disk space are also used here.
The rootfs is ready!
Configuration management, and conffs
As mentioned earlier, the configuration and creation of the conffs is done by applying our steps again, but this time focusing only on the configuration, not the core of the image.
To generate the conffs, we will simply use the apply_internships to re-apply the stages, but this time simulating a target machine corresponding to the machine for which you wish to generate the configuration. If we have 10 images from a master, to generate the 10 conffs we will re-apply our stages on 10 dockers.
This step is actually faster than rootfs generation, despite the number of hosts, since Ansible has already done the most time-consuming tasks, such as installing the packages.
Let’s look at how we are going to proceed:
Let’s build our conffs with build_conffs.
The first step in building the conffs is to know which conffs to build (![]() ).
).
For this, we have an option in the vauban configuration, which tells us which hosts to build conffs against: conffs (original).
Let’s go back to our config file presented above, but this time a little more complete :
"debian-11-generic-amd64.raw":
  name: debian-11/iso
  master-11-base:
    stages:
      - playbook_base.yml
    master-11-postgresql:
      stages:
        - playbook_postgresql.yml
      conffs: "postgresql*"
Note the addition of conffs to master-11-postgresql. This configuration means that for the master master-11-postgresql we will have hosts, which are identifiable by the expression postgresql\*. In reality, this expression corresponds to the one we would use with the --limit option of ansible-playbook. The syntax is exactly the same – logically enough – as the string is sent directly to ansible for interpretation.
So we could write postgresql*,*-postgresql*,!postgresql9* for example to match more selectively the hostnames we like.
Note that Vauban will automatically exclude hosts that begin by master-, to avoid generating conffs for “virtual” machines.
The get_conffs_hosts function takes care of asking ansible-playbook to expand the conffs string into a list of hostnames
The build_conffs function will then iterate over these 20 by 20 conffs to build in parallel with the conffs for these hosts, via the build_conffs_given_host function.
It should be noted that in order to find one’s way through the output of Vauban, each of the conffs built in parallel output its logs to its file in /tmp/vauban-logs/. The log file is more readable since it is only for one host, and allows a better understanding of the process of creating a conffs for a given host – and what may have potentially failed.
The conffs of a host with build_conffs_given_host
As explained earlier, build_conffs_given_host will reuse apply_stages. to generate the configuration.
The interesting part is not in the apply_stages, since it has already been presented, but on how to turn the final docker image into a conffs.
As mentioned, it is “sufficient” to recover and isolate the last layer(s) of the final image, those from the rootfs to the end. For this purpose, we iterate over the stages that have been applied for the conffs, and for each stage we get the associated docker layer via docker inspect. This is because, thanks to the magic of overlayfs and the docker CLI, it is easy to get the path on the machine of the result for a playbook application, in the form of a diff compared to the previous version. This means that we have effectively access to the differences, and only the differences, thus constituting the conffs.
If the notions of overlayfs, layer and diff are not clear, the docker documentation provided a fairly detailed and understandable explanation of how it works, and used in docker.
Let’s look at a concrete generated image:
$ docker inspect master-11-elastic/elastic01.stg.example.com | jq '.[0].GraphDriver'
{
  "Data": {
    "LowerDir": "/var/lib/docker/overlay2/4e24493e3903fd78c9609213951cfb814eb411c4952f779a790fa21fdf775950/diff:/var/lib/docker/overlay2/2de759e2e1cdfc162a98fc9cde8590d1620e84ec2ebdcb212400605edc7696bb/diff:/var/lib/docker/overlay2/3144822ed40ee30f1d14dcb9de5e0fcd392ddf4bbb84d9eb69ed3f74a8cb66a1/diff:/var/lib/docker/overlay2/a9c8a8046c5b6f5803b652ea8e6bf0f9c167b46f44824a33729369a7c73a8c55/diff:/var/lib/docker/overlay2/c6c1702d066203873cb5a436ccbbb14bd58a2ef121748ec266b9c6165e5dc957/diff:/var/lib/docker/overlay2/364d2cc01897285ef6a3fb10f23f20c469036eb2804a9e0ede8598fa686ad9f7/diff:/var/lib/docker/overlay2/62b40ebdd2ed2a952b482c560c56759e4f8e6ea3664e5d08a10e4cfd3330861a/diff:/var/lib/docker/overlay2/7a0086d242243b432f12ab95ebbe10415c1c6b4604e52bd8a1239cb89584febc/diff",
    "MergedDir": "/var/lib/docker/overlay2/6f45a6128d61a0e58df704548a7a3848c1bf1c6dca445f9d3f6b03cf63a5eee8/merged",
    "UpperDir": "/var/lib/docker/overlay2/6f45a6128d61a0e58df704548a7a3848c1bf1c6dca445f9d3f6b03cf63a5eee8/diff",
    "WorkDir": "/var/lib/docker/overlay2/6f45a6128d61a0e58df704548a7a3848c1bf1c6dca445f9d3f6b03cf63a5eee8/work"
  },
  "Name": "overlay2"
}
$ sudo tree /var/lib/docker/overlay2/6f45a6128d61a0e58df704548a7a3848c1bf1c6dca445f9d3f6b03cf63a5eee8/diff
/var/lib/docker/overlay2/6f45a6128d61a0e58df704548a7a3848c1bf1c6dca445f9d3f6b03cf63a5eee8/diff
├── imginfo
├── packages
├── root
│   └── ansible
│       ├── Diabolocom
│       │   └── inventory
...
├── tmp
│   ├── apt-after
│   └── apt-before
└── usr
    └── share
        └── elasticsearch
            └── config
                └── elasticsearch.yml

12 directories, 6 files
So if we look at the last layer of our image generated for a specific host, which here corresponds to the application of a playbook to configure elasticsearch, we can see that docker gives us the layer folder, and the latter contains only the diffs (12 directories, 6 files).
Let’s ignore the imginfo, packages, and tmp files for now, they will be presented later
Summarize all the records of all the conffs stages, and we get our conffs!
To sum up the steps built with overlayfs, what better way than to use again overlayfs? After all, that’s its purpose …
build_conffs_given_host will therefore retrieve all paths from the config layers, and mount an overlayfs with paths :
# overlayfs_args is built using `docker inspect`.

mkdir -p "overlayfs-${host}/merged" "overlayfs-${host}/lower" && cd "overlayfs-${host}"

if [[ -n "$overlayfs_args" ]]; then
    mount -t overlay overlay -o "lowerdir=lower$overlayfs_args,metacopy=off" merged
else
    echo "WARNING: Creating some empty conffs!"
fi
Due to the nature of the overlayfs and the archive we are trying to create, it is not possible to export a file deletion that has taken place in the conffs if created in the rootfs.
If a file is created in rootfs, and deleted in conffs, it is not possible to export this notion of file deletion as does overlayfs.
For more details on this, you can look at the implementation of the deletion in overlayfs with a char device file.
The mounted result is the host’s own configuration, and is accessible in the folder in which it was mounted. All we have to do is compress this directory to generate our conffs.
This is done using tar, and care is taken to exclude /var/log, /var/cache and /root/ansible.
Our conffs is ready!
Upload all these resources with upload.
Once our 4 resources have been created, they must be made available to our PXE servers. The final step in Vauban is the upload function, whose name is very explicit.
While there is not much to say about the functioning of the function itself, there is however a mechanism to manage the matching between the version of the kernel (and its associated initramfs), and the version of the kernel modules + sources in the rootfs.
Indeed, if we build the kernel+initramfs to have the latest version, but if the rootfs hasn’t been rebuilt for a while and uses an old kernel, there will be a mismatch in /usr/lib/modules, and thus an inability to to use modules, etc.
Moreover, as the initramfs and kernel are identical from one master to another, it is relevant to pool them to avoid having too much duplication.
For this, the upload function takes care of positioning the resources according to the following provision:
/root/of/PXE-configurable_in_vauban_options
├── linux
│   ├── initramfs.img.5.10.10
│   ├── initramfs.img.5.10.11
│   ├── vmlinuz.5.10.10
│   └── vmlinuz.5.10.11
├── master-11-elasticsearch
│   ├── conffs-elasticsearch01.prd.example.com.tgz
│   ├── conffs-elasticsearch01.stg.example.com.tgz
│   ├── conffs-elasticsearch02.prd.example.com.tgz
│   ├── conffs-elasticsearch03.prd.example.com.tgz
│   ├── initramfs.img -> ../linux/initramfs.img.5.10.11
│   ├── vmlinuz -> ../linux/vmlinuz.5.10.11
│   └── rootfs.tgz
└── master-11-postgresql
    ├── conffs-postgresql01.prd.example.com.tgz
    ├── conffs-postgresql01.stg.example.com.tgz
    ├── conffs-postgresql02.prd.example.com.tgz
    ├── conffs-postgresql03.prd.example.com.tgz
    ├── initramfs.img -> ../linux/initramfs.img.5.10.10
    ├── vmlinuz -> ../linux/vmlinuz.5.10.10
    └── rootfs.tgz
The linux folder contains the kernels and initramfs, suffixed with their version, and the masters files make a symlink on the version that concerns them.
The conffs should not contain kernel modules or updated rootfs’ modules to avoid breaking this mechanism which does not allow to have host-based granularity.
Integration with the docker registry
Because all our rootfs and conffs are hierarchically constructed and built via Docker, it is also interesting to use a docker registry to store the final images ready for export, and the intermediate images as well.
To do this, all docker' commands are actually wrapped in a function from utils.sh`, which takes care of :
- Automatically log in to the registry with the values defined in the vauban configuration if necessary. Not very useful on a personal laptop, but much more in the CI for example
- Retag the image during a docker build to have in addition to the latest tag, a tag with the current datetime (ISO 8601), and with the name of the registry
- Push the image and tags to the registry
The function goes hand in hand with the pull_image function which takes care of pulling the image if it doesn’t exist, trying to be clever about the name of the image (with or without the registry).
This allows us to have a tool that works between several hosts and CI runners, and to not fear local deletion of a docker image.
How do you put it all together?
The question now is how to boot on these resources, and how they fit together.
This article is not intended to present in detail how to build a PXE and DHCP stack, so we will assume that this aspect is already covered.
PXE boot options
Let’s look at an example of how to configure grubnet to boot with PXE on a master with his conffs :
set root="/srv/PXE/"
set master="master-11-elasticsearch"
set master_file="rootfs.tgz"
set initramfs="initramfs.img"
set conffs="conffs-elasticsearch01.prd.example.com.tgz"

set boot_opts="console=tty0 console=ttyS0,115200 net.ifnames=0 verbose \
               rd.debug rd.shell rd.writable.fsimg=1 rd.luks=0 rd.lvm=0 \
               rd.md=0 rd.dm=0 rd.neednet=1 rd.live.debug=1 rd.live.image \
               rootflags=rw rootovl systemd.debug_shell"

menuentry "PXE ${master}/${conffs}" {
    insmod gzio
    echo "Loading Linux ${master} from ${root} with ${conffs} ..."
    linux ${root}/${master}/${vmlinuz} boot=tmpfs
            root=live:http://<this server IP address>/${master}/${master_file} \
            live.updates=http://<this server IP address>/${master}/${conffs}
            pxemac=${net_default_mac} ip=eth0:dhcp:${net_default_mac} \
            ${boot_opts}
    echo "Loading initramfs from ${root} ..."
    initrd ${root}/${master}/${initramfs}
}
The generation and management of this configuration – specific to each host – is left to the discretion of the reader.
Well, the configuration seems a bit harsh on first approach, of course.
The basic idea is to indicate via the linux and initrd directives where to find the kernel and initramfs, but also to configure the kernel via the command line.
The first variables should be relatively simple to understand, but on the other hand boot_opts deserves some further explanation.
Before we get into that, let’s look at the other directives given to linux.
The root option will be used by initramfs to find out where to find the rootfs. See dracut.cmdline(7) to understand all the options available, but essentially here we prefix the URL with live: to indicate that we are going to boot on a live image, found on the network and placed in RAM. The address points to our rootfs, via HTTP (make sure that the rootfs can be downloaded from the specified address).
The live.updates option allows us to specify our conffs in the same way.
The pxemac and ip options allow us to force a network configuration in the initramfs, here using the eth0 interface to find an IP with the specified MAC. This setting may need to be adjusted depending on the infra. The net_default_mac variable, on the other hand, must be changed from one machine to another, quite logically.
Next, we provide the boot_opts defined above.
These options allow us to configure linux (net.ifnames=0), but there are mostly about dracut. The options starting by rd... are dracut options (see the dracut.cmdline(7) documentation page for more details).
Here we explicitly disable options that we do not need, to save time at boot by not checking things that don’t exist in our setup, like luks, md or lvm.
On the other hand, the need for a network stack (rd.neednet=1) is indicated, and the the fact that we want to have a writable rootfs as well.
Have a read-write system
One of the limitations of booting live on a squashfs rootfs is the inability to writing. A system with a read-only /partition is much more expensive to administrate than a system with a read-only partition, so we’ll have to find a way around.
To be able to write to our partition in read-only mode, it would be interesting to to have a system where the squashfs can be read, but the writing would be done elsewhere, in a place where one can write. We’d also need the final representation of / to be the sum of the read-only partition + the changes made.
If this sounds familiar, it’s normal, I’m describing overlayfs once again.
We just need to make an overlayfs with our rootfs as the bottom layer, an upperlayer backed as a tmpfs and mount its merged directory on / to have a read/write system.
While we’re at it, we might as well add our conffs to the overlayfs, since it’s also a simple method to incorporate its changes into the stack.
So we would end up with something similar to :
tmpfs on /live/cow type tmpfs (rw,relatime,mode=755)
/dev/mapper/live on /live/image type squashfs (ro,noatime)
overlay on / type overlay (rw,noatime,lowerdir=/live/image:/live/cow/conffs,upperdir=/live/cow/rw,workdir=/live/cow/work,default_permissions)
Something interesting with this system is also the possibility to know what changes have been made to the filesystem since the machine booted, thanks to overlayfs. One just need to look at the contents of the upperdir to find out.
The modules responsible for this operation are in modules.d in the vauban project. These are slightly modified versions of dracut modules that already exist and can be found on their git repo.
How to use vauban in everyday life?
config.yml
Previously I mentioned the config.yml configuration file of vauban to indicate what to build and how. In reality the vauban project itself is not able to read this file, this is the role of ci.py, the script executed in the CI – which can also be run manually – which takes care of reading the configuration and invoking vauban with the correct options.
branchs
The config.yml file contains the declaration of masters and conffs. If the general operation has already been presented above, there is also the possibility to specify the branch to be used for the master in general, more generally than specifing it only for a `stage’. Consider the following example:
  master-11-docker-compose:
    stages:
      - playbook_docker-compose.yml
      - bugfix/fix-sshd@playbook_authentication.yml
    conffs: "compose*,docker-compose*,!docker-compose-foo*"
    branch: bugfix/fix-docker-permissions
In this example, we set the default branch for master-11-docker-compose. to bugfix/fix-docker-permissions, while specifying a more specific branch for the playbook playbook_authentication.yml.
Quite logically, given the definition of the configuration of a master, it is not possible to call a master stages, conffs or branch. A key dictionary that is not part of this list is the definition of a master son, inheriting our current master.
CLI de vauban
The CLI of vauban should be quite complex to use on a daily basis due to its completeness and number of options:
# ./vauban.sh -h
Build master images and makes coffee
Usage: ./vauban.sh [-r|--rootfs <arg>] [-i|--initramfs <arg>] [-l|--conffs <arg>] [-u|--upload <arg>] [-f|--iso <arg>] [-s|--source-image <arg>] [-k|--ssh-priv-key <arg>] [-n|--name <arg>] [-b|--branch <arg>] [-a|--ansible-host <arg>] [-h|--help] [<stages-1>] ... [<stages-n>] ...
    <stages>: The stages to add to this image, i.e. the ansible playbooks to apply. For example pb_base.yml
    -r, --rootfs: Build the rootfs ? (default: 'yes')
    -i, --initramfs: Build the initramfs ? (default: 'yes')
    -l, --conffs: Build the conffs ? (default: 'yes')
    -u, --upload: Upload the generated master to DHCP servers ? (default: 'yes')
    -f, --iso: The ISO file to use as a base (no default)
    -s, --source-image: The source image to use as a base (no default)
    -k, --ssh-priv-key: The SSH private key used to access Ansible repository ro (default: './ansible-ro')
    -n, --name: The name of the image to be built (default: 'master-test')
    -b, --branch: The name of the ansible branch (default: 'master')
    -a, --ansible-host: The ansible hosts to generate the config rootfs on. Equivalent to ansible's --limit, but is empty by default (no default)
    -h, --help: Prints help
ci.py to simplify
To overcome this, it is best to use the ci.py script, to not have to set the vauban invocation options on the CLI, but use those defined in config.yml.
The script has been designed to work via Gitlab-CI, but is also usable locally. The script takes its arguments from environment variables (as it has been designed to work in a CI), and automatically reads config.yml to deduct the rest.
The arguments are as follows:
-
name: The name of the master to be built -
stage: What to build (rootfs,initramfs,conffs,all) -
build_parent: If set to a value greater than 0, builds as many parents than requested -
debug: If set totrueoryes, does not run vauban.sh but displays the vauban.sh commands that will be executed
For build_parent, the parent of a master (rootfs) is the master (rootfs) it inherits from.
For build_parent, the parent of a conffs or an initramfs is the associated rootfs.
For build_parent, if stage is set to all, then stage=all will also be applied to the master(s) it inherits from
Examples of use
# I want to build all the components of a master
name=master-11-docker-compose stage=all ./ci.py

# I want to rebuild only the rootfs and conffs
name=master-11-docker-compose stage=rootfs ./ci.py && name=master-11-docker-compose stage=conffs ./ci.py
# or
name=master-11-docker-compose stage=conffs build_parents=1 ./ci.py

# I want to rebuild all the rootfs that my master inherits
name=master-11-docker-compose stage=rootfs build_parents=5 ./ci.py  # If there are 5
# or
name=master-11-docker-compose stage=rootfs build_parents=-1 ./ci.py
# or
name=master-11-docker-compose stage=rootfs build_parents=yes ./ci.py
Vauban configuration
Vauban requires certain secrets and configuration settings to work. These parameters are not specific to a given master as can be the options in config.yml, but are more generic.
For this reason, these values can be configured via two options:
- environment variables
- a .sh file
In any case, the file to look at for configuration is vauban-config.sh.
To set the values via the file, it is possible to modify vauban-config.sh directly, or create a .secrets.env file that will be sourced by vauban-config.sh automatically.
The format of .secrets.env should look like this
export REGISTRY_HOSTNAME='registry.example.com
export REGISTRY_USERNAME='robot$example
export REGISTRY_PASSWORD='mzoihgmdnvmiezgdvzeogDdozegp'
The keys are of course those in vauban-config.sh.
For configuration via environment variables, the principle remains the same:
$ export REGISTRY_HOSTNAME='registry.example.com'.
$ export REGISTRY_USERNAME='robot$example'
$  REGISTRY_PASSWORD='mzoihgmdnvmiezgdvzeogDdozegp' ./vauban.sh
The variables are normally presented in sufficient detail in vauban-config.sh.
It is not possible to use an environment variable in a pre/post ansible hook.
A variable defined in .secrets.env cannot be overwritten with a environment variable.
Vauban limitations and things to know
Tracability
One of the advantages of Vauban, as mentioned above, is its approach to statelessness and IaC. Thanks to the way we build our image, it is also possible to add traceability to operations that have been made to reach the final image.
In the same way that a docker inspect on a docker image will give you the list of commands that have been executed to generate the image (be careful not to no secrets there!), vauban has two files:
-
/imginfo, which contains, in YAML format, the ansible playbook application list with the date, the git branch, the commit hash and the hostname of the machine that was used. -
/packages, also in YAML format, which contains the list of differences on installed packages, step by step.
It is therefore possible from any docker image, or directly in the booted VM, to read these files for information on the content of the image.
Let’s look at these files as examples:
---
iso: debian-11-generic-amd64.raw
date: 2022-01-31T10:54:34+00:00
stages:

    - date: 2022-01-31T16:28:38+00:00
      playbook: pb_base.yml
      hostname: master-11-base
      source: debian-11/iso
      git-sha1: 241d000c558f572eb7c713030a9877333514adbc
      git-branch: master

    - date: 2022-02-01T12:51:06+01:00
      playbook: pb_netdata.yml
      hostname: master-11-netdata
      source: master-11-base
      git-sha1: fd1876af78c1b75443846621fc1dfbc7415ae2f3
      git-branch: add-netdata

    - date: 2022-02-01T14:20:42+01:00
      playbook: pb_netdata.yml
      hostname: netdata01.stg.example.com
      source: master-11-netdata
      git-sha1: fd1876af78c1b75443846621fc1dfbc7415ae2f3
      git-branch: add-netdata
You can see newly installed packages, and package updates. Note also the construction of a conffs for the host netdata01.stg.example.com
---
packages:

    - playbook: pb_base.yml
      hostname: master-11-base
      packages: |
          + apt-transport-https/stable,now 2.2.4 all [installed]
          ...
          - util-linux/stable,now 2.36.1-8 amd64 [installed,upgradable to: 2.36.1-8+deb11u1]
          - uuid-runtime/stable,now 2.36.1-8 amd64 [installed,upgradable to: 2.36.1-8+deb11u1]
          - vim-common/now 2:8.2.2434-3 all [installed,upgradeable to: 2:8.2.2434-3+deb11u1]
          - vim-runtime/now 2:8.2.2434-3 all [installed,upgradeable to: 2:8.2.2434-3+deb11u1]
          - vim-tiny/now 2:8.2.2434-3 amd64 [installed,upgradable to: 2:8.2.2434-3+deb11u1]
          - vim/now 2:8.2.2434-3 amd64 [installed,upgradable to: 2:8.2.2434-3+deb11u1]
          - wget/now 1.21-1+b1 amd64 [installed,upgradable to: 1.21-1+deb11u1]
          + util-linux/stable-security,now 2.36.1-8+deb11u1 amd64 [installed]
          + uuid-runtime/stable-security,now 2.36.1-8+deb11u1 amd64 [installed]
          + vim-common/stable,now 2:8.2.2434-3+deb11u1 all [installed,automatic]
          + vim-runtime/stable,now 2:8.2.2434-3+deb11u1 all [installed,automatic]
          + vim-tiny/stable,now 2:8.2.2434-3+deb11u1 amd64 [installed]
          + vim/stable,now 2:8.2.2434-3+deb11u1 amd64 [installed]


    - playbook: pb_netdata.yml
      hostname: master-11-netdata
      packages: |
          + libjudydebian1/stable,now 1.0.5-5+b2 amd64 [installed,automatic]
          + libnetfilter-acct1/stable,now 1.0.3-3 amd64 [installed,automatic]
          + libprotobuf23/stable,now 3.12.4-1 amd64 [installed,automatic]
          + libsnappy1v5/stable,now 1.1.8-1 amd64 [installed,automatic]
          + netdata/bullseye,now 1.33.0-11-nightly amd64 [installed]

    - playbook: pb_netdata.yml
      hostname: netdata01.stg.example.com
      packages: |
You can see newly installed packages, and package updates.
The last stage did not change any packages.
Limitations with Ansible
No systemd or kernel
If on of the main goals of the project is to be able to build “offline” and hierarchical images, one of the major drawbacks is how Ansible is applied in a Docker container to build said images.
The Docker container does not run on its own kernel, but on the host’s. If any Ansible tasks require interaction with the kernel, errors will occur. For example:
- The use of the
sysctlmodule with the immediate application option - DKMS kernel module build (like ZFS)
Furthermore, systemd is not the init process of the container (and cannot be). All operations that require interaction with a running systemd will fail, such as service state=restarted.
Enabling/disabling a systemd service is an offline operation which can therefore be made in vauban.
Operations like delegate_to are also likely to fail if nothing is done in the hooks to allow the connection.
There are surely other specific interactions of the same nature that may not work. These operations remain rare, and it is normally possible to run most roles and playbooks with Vauban quite easily.
To preserve some of the runtime behaviour in Ansible, it may be necessary to provide a condition like: when: ansible_connection|default('dummy') != 'local'. Another possibility would be to define in group_vars/all.yml a variable vauban: true in the pre-ansible vauban hooks, and filter with when: not vauban|default('false').
Persistent volumes
One of the current weaknesses of vauban is the management of persistent volumes.
In the same way as containers, which can be assimilated to our images bootable with PXE, it is possible to have persistent storage by mounting a disk in the machine.
While this system works very well for storing persistent data, the problem is bootstrapping a new machine. If you want to have data defined by Ansible in a persistent mount point, this data will not be accessible by default on the first launch of our VM.
For example:
Let’s assume that we want to have persistent data stored in /srv/my-custom-app.
It turns out that we also want to modify one or more configuration in /srv/my-custom-app. So we’ll do it with ansible, build the image with vauban, and thus have /srv/my-custom-app with our configuration.
Now, when we boot our first VM with this image, we also provide a disk to mount on /srv/my-custom-app.
This disk will potentially need to be partitioned and the filesystem(s) created. This operation cannot be done directly from vauban, as it is specific to the VM.
If now the disk is ready, and mounted in /srv/my-custom-app. By default, the configuration files that were put in this folder will not exist, since there are located “below” the mount point, in the image and not on the disk.
The simplest solution is still to apply our Ansible for a second time on the newly created VM to bootstrap the VM.
Once this is done, the VM behaves as expected, and can be restarted without any problems.
For this reason, it is preferable to mount only persistent data, and not the configuration, on the volumes. The configuration can be put in live via ansible, and permanently in the image if necessary.
For the management of partitions and filesystems on persistent disks, either using a network fs (already partitioned and formatted) may be suggested, either a service that starts early in the boot process to create the partitions can solve the problem.
Conclusion
I hope that this article has been illuminating on some points, and that the project has intrigued you.
The project is available on GitHub.
I was also able to give a lecture available on YouTube (in french) presenting the project at the Nuit de l’info 2021.
If you have any other questions or comments, I will be happy to receive them on GitHub, or by email.
Thank you for reading this to the end ![]()
Leave a Comment
Your email address will not be published. Required fields are marked *